Every screenshot shortcut on Windows and Mac
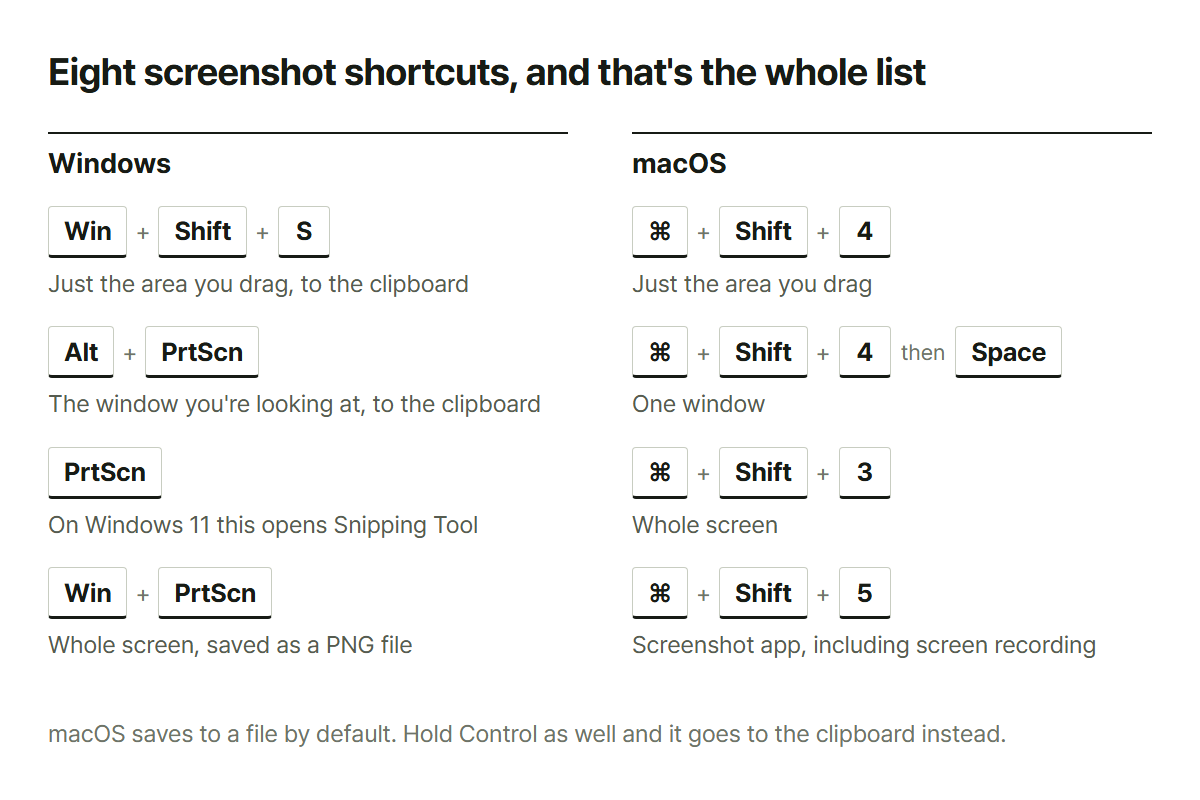
There are four screenshot shortcuts on Windows and four on the Mac. Eight in total, and yet most of us still look them up every time.
Write them down once and you stop searching. One thing worth checking even if you already know these: Windows 11 changed what the PrtScn key does, so if you learned the old behavior, that part is different now.
Windows
Win + Shift + S just the part you want
This is the one you'll actually use. The screen dims, you get a crosshair, and you drag over whatever you want. The shot goes to the clipboard, so you can paste it straight into a chat or a document with Ctrl+V. Click the notification in the corner and an editor opens, where you can save it as a file.
Alt + PrtScn only the window you're looking at
No desktop, no other windows. When you want to send someone one window and nothing else, this is the cleanest way. It goes to the clipboard.
PrtScn this one changed
On Windows 10 this key copied the whole screen to the clipboard. On Windows 11 it opens the Snipping Tool instead. If you do not know that changed, you end up wondering why pasting stopped working.
You can have the old behavior back: Settings › Accessibility › Keyboard › turn off "Use the Print screen key to open screen capture". After that it copies to the clipboard again.
Win + PrtScn straight to a file
The whole screen lands in Pictures › Screenshots as a PNG. It skips the clipboard entirely, which is what you want when you're taking several in a row. The screen flashes once when it has saved.
Mac
The Mac has one rule that explains the rest: by default it saves a file, and holding Control puts it on the clipboard instead. Everything else is a combination.
⌘ + Shift + 4 just the part you want
While you're dragging, a few keys do useful things.
- Hold Space and the selection moves as a whole: same size, new position
- Shift resizes one edge only
- Option resizes from the center
- Esc cancels
⌘ + Shift + 4, then Space one window
The cursor turns into a camera. Click the window you want and you get that window only. It comes with the drop shadow attached; if the shadow bothers you, hold Option while you click.
⌘ + Shift + 3 the whole screen
⌘ + Shift + 5 the capture tool
Screen recording lives here. Record everything, record a selected area, a 5 or 10 second timer, and the setting for where files are saved: all of it is in this one panel. If you have been looking for how to record your screen on a Mac, this is it.
The Mac saves to the desktop by default. Don't want your desktop filling up with screenshots? Press ⌘+Shift+5 and change the folder under Options. It is one setting, and you will be glad of it in a few months.
The harder part comes after
What actually eats your time is everything after the shot. You need to know the pixel dimensions, you have to crop off the menu bar that came along for the ride, and the file is too big to send. Those three things are why you end up opening an image editor.
You can get all three of those done in the image board. Send a screenshot to it with Ctrl+V, or ⌘V on a Mac, and the dimensions and ratio are already waiting; cropping, resizing and saving as PNG, JPG or WebP follow in the same panel. Nothing gets uploaded anywhere, so the file stays on your machine the whole time.
Sources
- Microsoft changed the Print Screen default (checked 2026-08-11)
- How to change it back (checked 2026-08-11)